Slideroll Help
This is the documentation for the Slideroll Slideshow Creator application. Choose among the topics below for help on a particular subject.
- Slideroll Terminology
- Keyboard and Mouse Controls
- Getting Started
- Uploading Photos
- Creating a New Slide show
- Adding Slides to the Slide Tray
- Creating Text Slides
- Working with the Timeline
- Working with Shots
- Transitions
- Cropping, Panning and Zooming Shots
- Previewing your Slide show
- Publishing your Slide show
- Emailing your Slide show
Slideroll Terminology
This program uses many terms that are familiar to you, however the context in which they are used may be a little different than what you are used to. Following is an explanation of some common terms and how they are used in Slideroll.
- Photo - a digital picture, which is a file that contains image data. When a photo is added to a slide show project, it becomes a slide.
- Project - the working file for your slide show, which contains all of the working data and slide show settings.
- Slide - a still image or title text in a frame. It can be used as many times as you wish in a single slide show.
- Slide Tray - the window where all of the slides in the show reside. Slides may or may not be in the show, but they are stored in your slide tray as a resource.
- Shot - an instance of a slide on the timeline. A shot has a beginning and end point, and may have panning and zooming while it is visible during playback.
- Timeline - the representation of how your slide show displays over time. Slides dropped on the timeline create special copies of themselves called shots.
Keyboard and Mouse Controls
Slideroll has a drag-and-drop interface. Almost every action can be completed using only a mouse. In some cases, there is added functionality when the shift and control buttons are used in conjunction with the mouse. For instance, you can select a series of photos in the photo manager by choosing one photo, then holding down shift and choosing another further down the list.
Getting Started
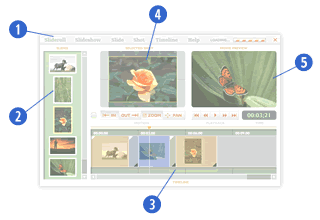
Slideroll has a fairly simple interface that may appear familiar to you if you've used video editing software. It consists of program menus(1) at the top, a slide tray(2) for your resources on the left side, a timeline(3) at the bottom, a sample pane(4) for previewing individual shots, and a preview pane (5) for previewing your finished slide show.

The menus and there functions are as follows:
- Slideroll - About the program, show the "Getting Started" dialogue, and go to the Slideroll home page.
- Slide show - Load and save your slide show projects, change slide show properties, preview and publish your slide shows.
- Slide - Add and delete slides, upload photos, and create text slides.
- Shot - Select, swap, and delete shots.
- Timeline - Speed up, slow down, reverse, and clear the timeline.
Since the objective of Slideroll is to create slide shows from your digital photos, the first thing you need to do is upload your photos.
Upload Photos
When you start the creator, you will see a dialogue box entitled "Get Started Using Slideroll". Click on the "Upload Photos" button to begin uploading your photos.

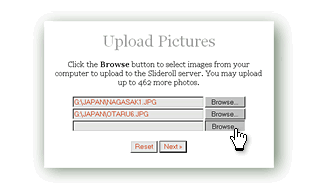
A pop-up window will appear, and then you can click 'browse' to find photos on your computer to upload. You can also activate this pop-up by clicking the "Upload More" button from the photo manager dialogue box.
Photos that you wish to upload must be available on your computer's hard drive. They must also be in JPEG format. Almost all digital cameras save in this format by default.
Creating a New Slide show
When you start the creator, it begins with a blank palette for you to begin building a new slide show. The procedure for creating a slide show is as follows:
- Upload your photos to the site.
- Add them as slides to your project.
- Drag the slides onto the timeline and arrange them as you see fit.
- Adjust individual shot, adding cropping, panning and zooming as necessary.
- Save your slide show.
- Preview if necessary, and then publish.
- Email a link to your friends if you wish.
When you start a slide show, it is a good idea to check its properties by selecting . There, you can edit the fade in and fade out times, default shot length adn overlap, and choose a thumbnail image for representation on the site.
Adding Slides to the Slide Tray
Once you've uploaded your photos, it's time to add them to your project. In the menu, select . Then a dialogue box entitled "My Photos" will appear. Your photos will appear in the center well. You may then drag and drop photos from the dialogue box onto the slide tray. Holding down shift will allow you to select a series of images, and holding down control will allow you to select multiple non-adjacent images.
Creating Text Slides
You can also create title slides for use in your slide show. You can edit the titles directly in the sample pane. These can be panned and zoomed just like regular slides, and you can even adjust the background color. To add a text slide, select . A new text slide will appear in your slide tray. To edit the text in it, drag the slide onto the timeline. It will create a shot, and you can edit the text by clicking on the title in the sample pane. To change the background color of the text slide, choose the rainbow button next to the sample pane.
Working with the Timeline
The timeline is the visual representation of your slide show over time. The timeline contains a horizontal strip where shots are placed. Above the strip are time markers. When the timeline gets longer than can be displayed, a horizontal scroll bar will appear so you can scroll back and forth along the timeline. Above the timeline is the playhead. You can scrub the timeline by dragging in the orange zone above the timeline. To add shots to the timeline, simple drag slides from the slide tray onto the timeline. You can select multiple slides by pressing shift to select a series or control to select multiple non-adjacent slides.
Working with Shots
Shots are instances of slides in the slidetray. There appearance in the slide show corresponds to their inpoint and outpoint on the timeline. If shots overlap, they will automatically fade between one another. You can drag them back and forth by pressing and dragging on their middle area. Pressing and dragging on the ends adjusts their duration. Adjacent shots will automatically stick together, so you have to click and drag on the corner tabs to pull them apart. Shots cannot be dragged past one another on the timeline. To change their order, you can 'tear off' a shot by dragging a shot down off the timeline, at which point you can place it again anywhere on the timeline.
Transitions
The simplest transition to make is a fade transition. To create a fade transition, simply overlap two shots on the timeline. Once you have a fade transition, you can alter the transition effect by selecting the slide you are transitioning to, and then choosing an effect from the transitions menu. The transitions menu is the yin-yang button next to the sample pane, above the rainbow button. You can also create interesting transitions by creating text slides, erasing the text, and setting the background color to something other than black. Then, if you place the blank text slide over an image, it can fade to a color.
Cropping, Panning and Zooming Shots
If you click on a shot in the timeline, it will appear in your sample pane. Below that, the inpoint and outpoint controls will become active. If you click on the inpoint button, you can crop the image by adjusting the zoom level and pan placement of the image. If you click the outpoint after that and make changes, the image will pan and/or zoom between the inpoint and outpoint. If you hold down shift during a pan, you can constrain your pan to perfectly horizontal or vertical. If you hold down shift during a zoom, you can match a zoom level between inpoint and outpoint.
Previewing your Slide Show
To preview your slide show, select . Your slide show must be saved before you can preview or publish it. Saving your slide show will only save the project data to the server, it will not publish it. When you preview your slide show, you can see how it will appear with the quality settings you've chosen, see how large the file size will be, and see how long it takes to load.
Publishing your Slide Show
To publish your slide show, select . You will see a dialogue box where you can choose your quality level settings, whether you want controls to appear, if you want to loop the slide show playback, whether or not you want it to be private, and if you wish to allow people to comment on it.
Once you publish, you'll see a pop-up window with your published slide show. You'll also see controls for entering a text description, obtaining HTML code to include it on your site, view and administrate comments, and e-mail it to friends.
Emailing your Slide Show
Emailing your slide show is simple. On your publish screen, simply click the e-mail button and enter the person's email address to whom you want to send your slide show. You can reach your publish page by publishing the slide show from the creator, or later by clicking on a slide show in "My Slide shows" on the main site.
Downloading Your Slide Show (Slideroll Pro)
Once your slide show is published, you can view the finished slideshow on your publish screen. Below the slideshow is a red button labeled "Download This Slideshow". Click on that button and you can download a ZIP file containing your slide show. You can also get to this screen by choosing "My Slideshows" in the main menu and clicking on one of your slide shows.